PRACTICAL IMAGE EDITING
Locate Small Text on a Phone with Zoom, Pan and a Short Brush Stroke
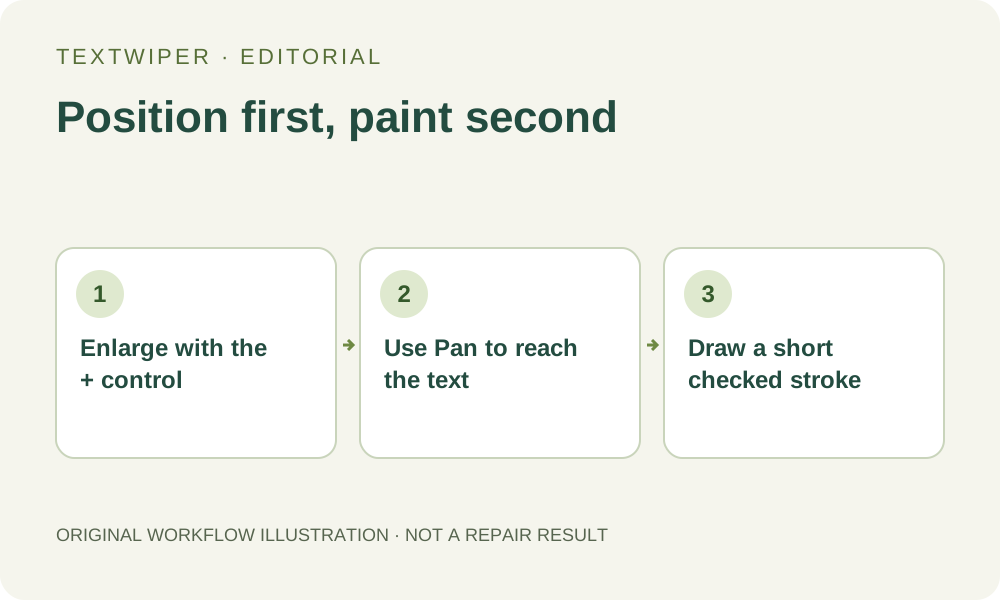
On a phone, separate looking around from drawing. Enlarge the image with the editor’s zoom controls, choose Pan to move the image inside its viewport, and switch back to Brush only when the target is positioned clearly.
Published 2026-10-15 · Updated
Make the target readable before touching the image
Small text can sit beside a product edge or near the corner of a large photo. At the fitted view, your fingertip may hide both the letters and the nearby detail. Begin with a supported image that you own or may edit, then use the plus control beneath the canvas to enlarge the working view. Use minus to step back and Fit to return to the fitted view.
The percentage describes the displayed image scale. Enlarging the view does not add detail to the source or enlarge the downloaded result. A blurred letter stays uncertain even when it occupies more screen space. This workflow uses the visible zoom buttons; it does not assume that a two-finger gesture controls the editor’s canvas zoom.
Switch to Pan before swiping across the canvas
Choose Pan in the toolbar before moving through a zoomed image. In Pan mode, a touch swipe uses the browser’s scrolling behavior inside the image viewport. There must be image content extending beyond the viewport for scrolling to move it. If the fitted image already fits completely, a swipe cannot reveal an additional hidden area.
Brush, Erase, Area and Protect have different purposes: contact on the canvas edits a removal or protection mark instead of intentionally navigating the image. A long swipe with Brush still active can therefore create a long unwanted stroke. Make selecting the mode a separate step rather than changing tools while your finger remains on the canvas.
- Tap the plus control until the target and its immediate surroundings are readable.
- Choose Pan, then swipe within the image viewport to bring the target away from the screen edge. Lift your finger when navigation is finished.
- Choose Brush and adjust its size. Make a short stroke over one clear portion of the unwanted text, then lift your finger.
- Inspect the green mark before continuing. Use Undo for a mistaken finished stroke, or Erase to trim the removal area.
- Return to Pan whenever you need another position. Switch back to the editing tool only after the new area is in view.
Judge brush size against the letters, not your fingertip
Brush width is expressed in image pixels. Its visible width changes with the image scale, so the same size can feel broad in a close view and narrow in the fitted view. Zooming does not automatically make a removal brush more precise. Adjust the size so the green area covers the letter edges while leaving useful neighboring lines outside it.
If a line of text is tightly packed against a logo or face, add blue Protect marks over details that should remain. Protection can also retain unwanted text when it overlaps the target, so inspect both colors. Use a few short strokes rather than covering a complicated boundary with one broad gesture. If recognition has already found the text, selecting a detected word or character is another option; recognition separately asks for upload permission.
Check both the close view and the whole composition
Before repairing, look for three mobile-specific mistakes: a green trail made while trying to navigate, a clipped selection at the viewport edge, and a blue mark hiding part of the deletion target. Reposition with Pan to inspect the entire boundary rather than guessing what lies offscreen. The close view is useful for placement, while Fit helps you see whether the intended target is complete.
After manual repair, the editor shows the full result. You can enlarge the repaired area again and use Show comparison when useful. Inspect small repeating details and straight edges, then return to Fit to judge whether a patch is noticeable in the composition. Download only after these checks, and reopen the exported image to check it outside the editing view.
Recognize when mobile gestures are not enough
If Pan appears unresponsive, first check the active tool and whether the zoomed image actually exceeds the viewport. If a drawing gesture is interrupted by the browser, inspect the mask before continuing rather than assuming that the partial stroke was saved. An interrupted stroke can be discarded. A refresh, closed page or new image is not a saved workspace.
Do not keep widening the mask when the original letters are too blurred to distinguish from an important edge. Use a clearer source or perform the careful boundary work on a larger screen. Manual selection, repair and downloads remain free during beta without an account; that does not make every source readable or every repair acceptable. The workflow diagram above explains the controls, not a guaranteed result on your phone.